" Ophcrack is an open source (GPL license) program that cracks Windows LM hashes using rainbow tables. The program includes the ability to import the hashes from a variety of formats, including dumping directly from the SAM files of Windows. There is also a Live CD version which automates the retrieval, decryption, and cracking of passwords from a Windows system. Rainbow tables for LM hashes of alphanumeric passwords are provided for free by the developers. These tables can crack 99.9% of alphanumeric passwords of up to 14 characters in usually a few seconds, and at most a few minutes. Larger rainbow tables (for LM hashes of passwords with all printable characters, including symbols and space) are available for purchase from Objectif Securité. Starting with version 2.3, Ophcrack also cracks NT hashes. This is necessary if generation of the LM hash is disabled (this is default on Windows Vista), or if the password is longer than 14 characters (in which case the LM hash is not stored)." read more...
Most of the people don't go with videos and read books for learning. Book reading is a really effective way to learn and understand how things work. There are plenty of books about computers, security, penetration testing and hacking. Every book shows a different angle how things work and how to make system secure and how it can be penetrated by hackers. So, here I have gathered a few of the best hacking books of 2018 available on the market.
BEST HACKING BOOKS OF 2018
There are hundreds of books about hacking, but I have streamlined few of best hacking books of 2018.
1. THE HACKER'S PLAYBOOK PRACTICAL GUIDE TO PENETRATION
This handbook is about experting yourself with the hacking techniques in the hacker's way. This is about penetration testing that how hackers play their techniques and how we can counter them.
CONTENTS
Introduction
Pregame – The Setup
Setting Up a Penetration Testing Box
Before the Snap – Scanning the Network
The Drive – Exploiting Scanner Findings
The Throw – Manual Web Application Findings
The Lateral Pass – Moving Through the Network
The Screen – Social Engineering
The Onside Kick – Attacks that Require Physical Access
The Quarterback Sneak – Evading AV
Special Teams – Cracking, Exploits, Tricks
Post Game Analysis – Reporting
Download the Hacker's Playbook Practical Guide to Penetration.
2. ANDROID HACKER'S HANDBOOK
The Android Hacker's Handbook is about how the android devices can be hacked. Authors chose to write this book because the field of mobile security research is so "sparsely charted" with disparate and conflicted information (in the form of resources and techniques).
CONTENTS
Chapter 1 Looking at the Ecosystem
Chapter 2 Android Security Design and Architecture
Chapter 3 Rooting Your Device
Chapter 4 Reviewing Application Security
Chapter 5 Understanding Android's Attack Surface
Chapter 6 Finding Vulnerabilities with Fuzz Testing
Chapter 7 Debugging and Analyzing Vulnerabilities
Chapter 8 Exploiting User Space Software
Chapter 9 Return Oriented Programming
Chapter 10 Hacking and Attacking the Kernel
Chapter 11 Attacking the Radio Interface Layer
Chapter 12 Exploit Mitigations
Chapter 13 Hardware Attacks
Download Android Hacker's Handbook.
3. PENETRATION TESTING: A HANDS-ON INTRODUCTION TO HACKING
This book is an effective practical guide to penetration testing tools and techniques. How to penetrate and hack into systems. This book covers beginner level to highly advanced penetration and hacking techniques.
CONTENTS
Chapter 1: Setting Up Your Virtual Lab
Chapter 2: Using Kali Linux
Chapter 3: Programming
Chapter 4: Using the Metasploit Framework
Chapter 5: Information Gathering
Chapter 6: Finding Vulnerabilities
Chapter 7: Capturing Traffic
Chapter 8: Exploitation
Chapter 9: Password Attacks
Chapter 10: Client-Side Exploitation
Chapter 11: Social Engineering
Chapter 12: Bypassing Antivirus Applications
Chapter 13: Post Exploitation
Chapter 14: Web Application Testing
Chapter 15: Wireless Attacks
Chapter 16: A Stack-Based Buffer Overflow in Linux
Chapter 17: A Stack-Based Buffer Overflow in Windows
Chapter 19: Fuzzing, Porting Exploits, and Metasploit Modules
Chapter 20: Using the Smartphone Pentesting Framework
Download Penetration Testing: A Hands-On Introduction To Hacking.
4. THE SHELLCODER'S HANDBOOK
This book is about learning shellcode's of the OS and how OS can be exploited. This book is all about discovering and exploiting security holes in devices to take over.
Authors: Chris Anley, John Heasman, Felix "FX" Linder, Gerardo Richarte.
CONTENTS
Stack Overflows
Shellcode
Introduction to Format String Bugs
Windows Shellcode
Windows Overflows
Overcoming Filters
Introduction to Solaris Exploitation
OS X Shellcode
Cisco IOS Exploitation
Protection Mechanisms
Establishing a Working Environment
Fault Injection
The Art of Fuzzing
Beyond Recognition: A Real Vulnerability versus a Bug
Instrumented Investigation: A Manual Approach
Tracing for Vulnerabilities
Binary Auditing: Hacking Closed Source Software
Alternative Payload Strategies
Writing Exploits that Work in the Wild
Attacking Database Software
Unix Kernel Overflows
Exploiting Unix Kernel Vulnerabilities
Hacking the Windows Kernel
Download The ShellCoder's HandBook.
5. THE HACKER'S HANDBOOK WEB APPLICATION SECURITY FLAWS
This handbook is about finding and exploiting the web applications.
Authors: Dafydd Stuttard, Marcus Pinto.
CONTENTS
Chapter 1 Web Application (In)security
Chapter 2 Core Defense Mechanisms
Chapter 3 Web Application Technologies
Chapter 4 Mapping the Application
Chapter 5 Bypassing Client-Side Controls
Chapter 6 Attacking Authentication
Chapter 7 Attacking Session Management
Chapter 8 Attacking Access Controls
Chapter 9 Attacking Data Stores
Chapter 10 Attacking Back-End Components
Chapter 11 Attacking Application Logic
Chapter 12 Attacking Users: Cross-Site Scripting
Chapter 13 Attacking Users: Other Techniques
Chapter 14 Automating Customized Attacks
Chapter 15 Exploiting Information Disclosure
Chapter 16 Attacking Native Compiled Applications
Chapter 17 Attacking Application Architecture
Chapter 18 Attacking the Application Server
Chapter 19 Finding Vulnerabilities in Source Code
Chapter 20 A Web Application Hacker's Toolkit
Chapter 21 A Web Application Hacker's Methodology
Download The Hacker's Handbook Web Application Security Flaws.
So, these are the top 5 best hacking books on the market. There may be more fascinating books in the future that make take place in the top list. But for now, these are the best hacking books. Read and share your experience with these books.
Y para acabar esta serie dedicada a los "Makers", os traigo dos proyectos más que son de lo más interesantes. El primero de ellos para que los que habéis jugado en las primeras consolas de juegos, en las maquinitas, y habéis visto el origen de juegos míticos como Super Mario Bros o Zelda, podáis volver a tener todos en vuestras manos. El segundo, un práctico proyecto para tener una cámara de vigilancia que tú puedas construir y controlar.
Figura 22: Raspberry Pi Zero para "Makers": 6 PoCs & Hacks Just for Fun (3 de 3)
Al final, como podéis comprobar en estas tres partes de la serie dedicada a Raspberry Pi Zero, la cantidad de utilidades que pueden darse son casi ilimitadas, así que anímate a construir tus propios gadgets.
5.- MintyPi: Un emulador de bolsillo
Si eres un aficionado a los videojuegos clásicos como el Super Mario Bros, Donkey Kong o Zelda hoy te enseñaremos cómo construir tu propio emulador de videojuegos utilizando la Raspberry Pi Zero y el software RetroPie. Hoy en día hacerse con una "consola vintage" y algunos cartuchos originales con juegos icónicos puede resultar bastante difícil y eso sin tener en cuenta los precios desorbitados que pueden llegar a alcanzar algunos de estos productos. Si no quieres gastarte una fortuna y te gustaría disfrutar de tus clásicos favoritos esta es tu mejor opción. Y si eres un "Maker" y te apetece divertirte, este es un proyecto digno de tu atención.
Comenzaremos hablándoos brevemente de RetroPie, este software te permitirá convertir cualquier modelo de Raspberry Pi en un emulador de videojuegos, está basado en Raspbian, Emulation Station y en otros proyectos similares que permiten jugar a juegos arcade, de consola o incluso de PC teniendo que realizar la mínima configuración posible.
Figura 23: Emulador de Super Nintendo corriendo en MintyPi
Su instalación es muy sencilla y ofrece dos posibilidades, la primera de ellas es su instalación sobre una versión de Raspbian - sistema operativo de Raspberry Pi - y la otra opción es su instalación a través de una imagen de disco.
En cuanto a sus posibilidades de personalización RetroPie no se queda atrás, es posible instalar temas personalizados e implementar más de 50 sistemas de juegos distintos - se pueden tener instalados varios emuladores simultáneamente -, desde modelos como la Nintendo 64 o la SNES hasta la GameBoy Advance o algunas máquinas recreativas de Atari. En cuanto a los juegos, la única limitación que tendremos será el tamaño de la tarjeta Micro SD que utilicemos en la Raspberry Pi.
RetroPie también ofrece la posibilidad de utilizar distintos tipos de controles para nuestros juegos. Antes de comenzar el software detectará si hemos conectado un teclado o ratón o un mando se cualquier tipo por USB y nos ofrecerá la posibilidad de configurar los botones y los controles a nuestro gusto para disfrutar se nuestra experiencia de juego cómodamente, además si tu Raspberry Pi cuenta con BlueTooth podrás conectar los mandos inalámbricos de Play Station o Xbox.
Figura 24: Tu emulado en la televisión
Ahora que ya conocemos un poco más este software es el momento de introducirnos de lleno en el primer proyecto de hoy. El proyecto en cuestión recibe el nombre de MintyPi y consiste en construir nuestro propio emulador totalmente funcional (con batería, botones y pantalla) dentro de una caja de caramelos. En este caso necesitaremos reunir los siguientes componentes para realizar nuestro montaje:
+Placa PCB con botones (lo ideal es comprar el Kit de MintyPi, pero también se pueden usar otros)
+Pantalla de 2,4 " para Raspberry Pi
+Kit de piezas impresas en 3D
*Tarjeta de sonido USB
+Altavoz de 20mm de diámetro y 3,5 mm de grosor
+Modulo de carga de batería
+Batería (puede servirnos una batería antigua de móvil)
+Kit de botones de una Nintendo DS Lite
+Cinta de doble cara
+Tornillos de métrica 2 (4x3mm, 4x8mm y 6x4mm)
Si reunir todas estas piezas te resulta difícil o tedioso también puedes adquirir algunos kits como este de la tienda de Helder, del diseñador de la placa PCB de MintyPi. En cuanto al montaje al igual que en otros proyectos de los que os hemos hablado la mayor dificultad reside en soldar algunos componentes y en realizar un par de orificios en la parte trasera de nuestra caja de caramelos.
A continuación resumiremos brevemente el proceso de montaje, como en este caso el proceso es un poco más técnico os recomendamos seguir este tutorial detallado en el que también podréis encontrar un vídeo en el que se explica todo el proceso de montaje.
Figura 26: Tutorial de montaje de mintyPi
Lo primero que deberemos hacer es realizar los agujeros necesarios en nuestra caja de caramelos y colocar los dos botones físicos que irán en la parte trasera, después colocaremos las bases impresas en 3D sobre las cuales se montarán posteriormente el resto de componentes (para ello podemos utilizar cinta de doble cara o cualquier tipo de adhesivo).
A continuación montaremos la placa PCB sobre una de las placas de soporte impresas en 3D y la soldaremos a nuestra Raspberry Pi Zero. Hecho esto Introduciremos la tarjeta Micro SD en la que habremos cargado previamente el software de RetroPie y continuaremos conectando la pantalla, la tarjeta de sonido y el altavoz.
Por otro lado, tendremos que realizar el montaje de la batería y el módulo de carga, los cuales irán en la parte inferior de la caja para disipar mejor la temperatura y poder colocar los botones en la parte superior sobre la placa PCB. Una vez tengamos todo conectado entre sí solo tendremos que cubrirlo con las tapas impresas en 3D que se sujetaran utilizando tornillos.
6.- Zero Security Camera: Cámara de Seguridad /Espía
En el último proyecto de esta serie os explicaremos cómo construir una cámara de vigilancia totalmente funcional y que podremos visualizar desde nuestro smartphone. La Raspberry Pi Zero es una unidad con un tamaño muy reducido y que permite la implementación de gran variedad de sensores lo que la convierte en la plataforma ideal para la construcción de pequeños dispositivos de vigilancia, además ofrece varias alternativas en lo que a conectividad y alimentación se refiere. Para darle un toque más interesante a esta posible aplicación de la Raspberry Pi Zero. A continuación, os explicaremos cómo construir una cámara de vigilancia convencional y cómo construir una cámara espía inalámbrica.
Para llevar a cabo la primera de las opciones expuestas anteriormente basaremos nuestro montaje en las cámaras de vigilancia falsas, también conocidas como cámaras Dummy. Estos dispositivos se pueden obtener en páginas como Amazon y Ebay o en la sección de electricidad de la mayoría de grandes superficies. Su construcción se basa en una carcasa vacía que contiene una lente (falsa) simulando ser una cámara de vigilancia funcional, en la mayoría de ocasiones también incorporan un diodo led alimentado con pilas y que parpadea para no levantar sospechas de ser un elemento puramente "decorativo". Para llevar a cabo este montaje necesitaremos los siguientes elementos:
Lo primero será encontrar la forma de alimentar nuestro conversor de voltaje, este se alimenta directamente desde la GPIO utilizando dos pines (uno a 5 v y otro a tierra), una vez alimentado el módulo ya podemos conectar el cable de la cámara. Ahora deberemos conectar el módulo LAN, este cuenta con una entrada micro USB que reúne 8 cables de los cuales deberemos retirar la mitad ya que solo necesitaremos 4 de ellos.
El extremo del Micro USB se conecta directamente a la Raspberry Pi Zero. Con el trabajo más difícil hecho solo tendremos que vaciar nuestra cámara Dummy, colocar la lente en la parte delantera de la carcasa e introducir la Raspberry Pi Zero dentro. Para terminar, cogeremos el cable ethernet (CAT 5) y conectaremos los cables azul y azul-blanco al positivo y los cables marrón y marrón-blanco al negativo de las salidas que quedan libres del conversor de voltaje.
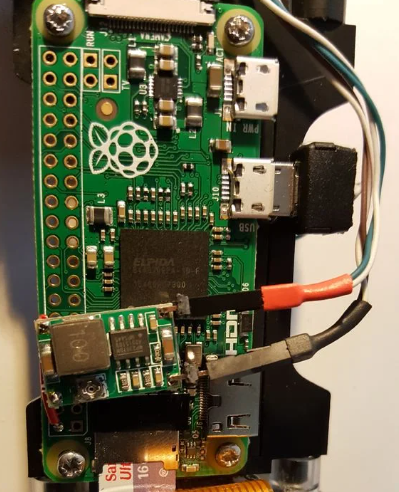
Figura 28: Conexiones en Zero Security Camera
Ya solo nos queda conectar el otro extremo del cable ethernet a nuestro router y colocar la cámara donde queramos (si buscas realizar una instalación limpia es recomendable que utilices varios metros de cable y algunas canaletas). Al utilizar un módulo LAN es importante tener en cuenta que este no tiene una única MAC, esto no supone un problema si solo conectamos una cámara a la red, pero sí que podría generar conflicto si añadiésemos otra posteriormente.
Figura 29: Cámara espía oculta en libro
Si por otro lado lo que buscamos es construir una cámara espía portátil nuestra mejor alternativa es optar por la versión con Wi-Fi de la Raspberry Pi Zero y evidentemente la carcasa en la que queramos colocar nuestra cámara dependerá del tamaño de la batería que utilicemos y el lugar en el que queramos ocultarla, por ejemplo, en un conducto de ventilación o dentro del típico libro que nadie ha leído y se encuentra en la estantería de nuestro despacho. En este caso los materiales necesarios serán los siguientes:
En este caso el montaje no tiene ningún misterio, solo tenemos que conectar el módulo de la cámara a nuestra Raspberry Pi Zero, utilizar el conector Micro USB para alimentarla con la batería portátil y conectarla a nuestra red Wi-Fi. En cuanto al software existen varias opciones para visualizar la cámara de nuestra Raspberry Pi Zero desde nuestro smartphone.
Una de las mejores opciones es RPi-Cam-Web-Interface ya que cuenta con una wiki bastante completa en la que se detalla paso a paso todo el proceso de instalación y configuración además de una guía avanzada de uso que incluye trucos y consejos.
Solo es el principio...
Hemos llegado al final de esta serie, y si he conseguido animaros solo a uno de vosotros a comenzar a construir cosas y empezar el camino de los "Makers", me daré por satisfecho. Esto no es el final, solo es el principio de un montón de cosas que tienes por construir.
Today we are going to go through Structures from defining structures to using structures. Structures are just a collection of different types under one roof (you can even put one type only!). So that means they give you flexibility of grouping different data types (like int, char, or even char[]) under one name. So let us start with obviously defining a Structure. In `C` we declare a structure as simply as this:- struct dob { int day; int month; int year;}; 1: In the above code segment struct is a keyword which defines structure. 2: Followed by struct keyword (dob) is the name of our structure. 3: Elements of struct are defined inside braces '{}' as we did (int day; etc). 4: After ending brace we place a terminator ';' to end the declaration. So now you know how to define a structure but how to create its instances now? To create a variable of our structure we just need to do this: struct dob date; This now declares date as a structure variable of type dob. 1: Here 'struct dob' is our above declared structure. 2: date is a variable of type dob. So ok we have a structure and a variable of that type but how can i access its parts? well we can access it and assign it so simply like this:- date.day = 19;date.month = 10;date.year = 1990; Note here we use the dot (.) operator to access the fields (parts) of our structure. ok everything looks nice so for but how in the world can i read data into this structure variable? Again no worries its again simple:- scanf("%d", &date.day);scanf("%d", &date.month); that was pretty easy but I was wondering how can i print its data? Just do it like this:- printf("Day: %d", date.day);printf("Month: %d",date.month);printf("Year: %d", date.year); Again remember we use dot (.) operator to access members of a structure. So we now know how to define and declare a structure, how to access its members, how to read data in it, and how to print data of a structure. Oh that was a tough job..! Now let us put it together in a single C Program.
/***********************************************/ #include <stdio.h> struct dob { int day; int month; int year; }; int main(void) { struct dob date; date.day = 19; date.month = 10; date.year = 1990; printf("Day is : %d, Month is: %d, and Year is %d\n", date.day,date.month, date.year); printf("Enter Day, Month, and Year separated by spaces: "); scanf("%d %d %d", &date.day,&date.month,&date.year); printf("Your entered Date is: %d/%d/%d", date.day,date.month,date.year); return 0; }
Output: Day is : 19, Month is: 10, and Year is 1990 Enter Day, Month, and Year separated by spaces: 1 1 2014 Your entered Date is: 1/1/2014
7 Types of hacker 1-Script Kiddies-They are just download overused software & watch youtube video on how to use it. Script kiddies don't care about hacking. 2-White Hat-They are the good guys of the hacker world. They also known as Ethical Hacker. 3-Black Hat-They finds bank or other companies with weak security and steal money or credit card information. They also known as cracker. They are dangerous because they are illegal to gain unauthorized access. 4-Gray Hat-They don't steal money or information sometimes they deface a website or they don't help people for good. 5-Green Hat-These are the hacker "noobz" but unlike Script Kiddies.They care about Hacking and strive to become full-blown hacker. 6-Red Hat-These are the vigilantes of the hacker world. They are like White Hats in that they halt Black Hats but these folks are downright SCARY to those who have ever tried so much as penetrest. 7-Blue Hat-If a Script Kiddy took revenge he/she might become a Blue Hat.Most Blue Hats are noobz.They have no desire to learn.
 " Ophcrack is an open source (GPL license) program that cracks Windows LM hashes using rainbow tables. The program includes the ability to import the hashes from a variety of formats, including dumping directly from the SAM files of Windows. There is also a Live CD version which automates the retrieval, decryption, and cracking of passwords from a Windows system. Rainbow tables for LM hashes of alphanumeric passwords are provided for free by the developers. These tables can crack 99.9% of alphanumeric passwords of up to 14 characters in usually a few seconds, and at most a few minutes. Larger rainbow tables (for LM hashes of passwords with all printable characters, including symbols and space) are available for purchase from Objectif Securité. Starting with version 2.3, Ophcrack also cracks NT hashes. This is necessary if generation of the LM hash is disabled (this is default on Windows Vista), or if the password is longer than 14 characters (in which case the LM hash is not stored)." read more...