A New Internet Library: Add Your Website/Blog or Suggest A Website/Blog to our Free Web Directory http://anil.myfunda.net.

Its very simple, free and SEO Friendly.
Submit Now....

Friday, September 4, 2020

Exploring Monster Taming Mechanics In Final Fantasy XIII-2: Viewing Data

Rails apps are built on an MVC (Model, View, Controller) architecture. In the last few articles of this miniseries, we've focused exclusively on the model component of MVC, building tables in the database, building corresponding models in Rails, and importing the data through Rails models into the database. Now that we have a bunch of monster taming data in the database, we want to be able to look at that data and browse through it in a simple way. We want a view of that data. In order to get that view, we'll need to request data from the model and make it available to the view for display, and that is done through the controller. The view and controller are tightly coupled, so that we can't have a view without the controller to handle the data. We also need to be able to navigate to the view in a browser, which means we'll need to briefly cover routes as well. Since that's quite a bit of stuff to cover, we'll start with the simpler monster material model as a vehicle for explanation.

Final Fantasy XIII-2 Battle Scene

Create All The Things

Before we create the view for the monster material model, we'll want to create an index page that will have links to all of the views and different analyses we'll be creating. This index will be a simple, static page so it's an even better place to start than the material view. To create the controller and view for an index page, we enter this in the shell:
$ rails g controller Home index
This command creates a bunch of files, but most importantly for this discussion it creates app/controllers/home_controller.rb and app/views/home/index.erb. If you haven't guessed by the names, these are our home controller and view for the index page, respectively. The command also creates an entry in config/routes.rb for the route to the index page. We want to add an entry to this file so that going to the root of our website will also take us to the index:
Rails.application.routes.draw do
get 'home/index'
root 'home#index'
end
These routes are simple. The first one says if we go to our website (which will be at http://localhost:3000/ when we start up the server in a minute), and go to http://localhost:3000/home/index, the HTML in app/views/home/index.erb will be rendered to the browser. The next line says if we go to http://localhost:3000/, that same HTML will be rendered. Currently, that page will show a simple header with the name of the controller and action associated with the page, and the file path to the view:
<h1>Home#index</h1>
<p>Find me in app/views/home/index.html.erb</p>
Let's change that to something closer to what we're aiming for:
<h1>Final Fantasy XIII-2 Monster Taming</h1>
<%= link_to 'Monster Materials', '#' %>
That second line with the link is created with a special line of code using the '<%= ... %>' designation. This file is not pure HTML, but HAML, an HTML templating language. The '<%= … %>' tag  actually means that whatever's inside it should be executed as code and the output is put in its place as HTML. The link_to function is a Rails function that creates the HTML for a link with the given parameters. Now we have a proper title and the first link to a table of data that doesn't exist. That's why I used the '#' character for the link. It tells Rails that there should be a link here, but we don't know what it is, yet. More precisely, Rails will ignore the '#' at the end of a URL, so the link will show up, but it won't do anything when it's clicked. Now let's build the page that will fill in the endpoint for that link.

Create a Monster Materials Page

Notice that for the index page we created a controller, but we didn't do anything with it. The boilerplate code created by Rails was sufficient to display the page that we created. For the materials page we'll need to do a little more work because we're going to be displaying data from the material table in the database, and the controller will need to make that data available to the view for display. First thing's first, we need to create the controller in the shell:
$ rails g controller Material index
This command is identical to the last Rails command, and it creates all of the same files for a material controller and view and adds an entry in config/routes.rb for the new page:
Rails.application.routes.draw do
get 'material/index'
get 'home/index'
root 'home#index'
end
In both cases we're creating a controller with only one action, but a Rails controller can have many different actions for creating, reading, updating, and deleting objects from a model. These are referred to as CRUD actions. Since we're only going to be viewing this data, not changing it in any way, we just need the read actions, and more specifically the index action because we're only going to look at the table, not individual records. Therefore, we specified the 'index' action in the generate command so the others wouldn't be created. Now it's time to do something useful with that action in app/controllers/material_controller.rb:
class MaterialController < ApplicationController
def index
@materials = Material.all
end
end
All we had to do was add that one line in the index action, and we've made all of the material model data available to the view. The view has access to any instance variables that are assigned in the controller, so @materials contains all the data we need to build a view of the material table. The HTML code to render the view is a bit more complex, but still pretty simple:
<h1>Monster Materials</h1>

<table>
<tr>
<th>Name</th>
<th>Grade</th>
<th>Type</th>
</tr>

<% @materials.each do |material| %>
<tr>
<td><%= material.name %></td>
<td><%= material.grade %></td>
<td><%= material.material_type %></td>
</tr>
<% end %>
</table>
The first half of this code is normal HTML with the start of a table and a header defined. The rows of table data are done with a little HAML to iterate through every material that we have available in the @materials variable. The line with '<% ... %>' just executes what's within the brackets without outputting anything to render. The lines that specify the table data for each cell with '<%= ... %>' will send whatever output happens—in this case the values of the material properties—to the renderer. We could even create dynamic HTML tags in this embedded code to send to the renderer, if we needed to. Here we were able to create the 40 rows of this table in seven lines of code by looping through each material and sending out the property values to the table. This tool is simple, but powerful.

Now we have another page with a table of monster materials, but we can only reach it by typing the correct path into the address bar. We need to update the link on our index page:
<h1>Final Fantasy XIII-2 Monster Taming</h1>
<%= link_to 'Monster Materials', material_index_path %>
It's as simple as using the provided helper function for that route! Rails creates variables for every route defined in config/routes.rb along with a bunch of default routes for other things that we won't get into. We can see these routes by running "rails routes" in the shell, or navigating to /routes on the website. Actually, trying to navigate to any route that doesn't exist will show the routes and their helper functions, which is what happens when we try to get to /routes, too. How convenient. Now we can get to the monster material table from the main index, and amazingly, the table is sorted the same way it was when we imported it. It's pretty plain, though.

Adding Some Polish

The material table view is functional, but it would be nicer to look at if it wasn't so...boring. We can add some polish with the popular front-end library, Bootstrap. There are numerous other more fully featured, more complicated front-end libraries out there, but Bootstrap is clean and easy so that's what we're using. We're going to need to install a few gems and make some other changes to config files to get everything set up. To make matters more complicated, the instructions on the GitHub Bootstrap Ruby Gem page are for Rails 5 using Bundler, but Rails 6 uses Webpacker, which works a bit differently. I'll quickly summarize the steps to run through to get Bootstrap installed in Rails 6 from this nice tutorial.

First, use yarn to install Bootstrap, jQuery, and Popper.js:
$ yarn add bootstrap jquery popper.js
Next, add Bootstrap to the Rails environment by adding the middle section of the following snippet to config/webpack/environment.js between the existing top and bottom lines:
const { environment } = require('@rails/webpacker')

const webpack = require('webpack')
environment.plugins.append('Provide',
new webpack.ProvidePlugin({
$: 'jquery',
jQuery: 'jquery',
Popper: ['popper.js', 'default']
})
)

module.exports = environment
Then, set up Bootstrap to start with Rails in app/javascript/packs/application.js by adding this snippet after the require statements:
import "bootstrap";
import "../stylesheets/application";

document.addEventListener("turbolinks:load", () => {
$('[data-toggle="tooltip"]').tooltip()
$('[data-toggle="popover"]').popover()
})
We may never need the tooltip and popover event listeners, but we'll add them just in case. As for that second import statement, we need to create that file under app/javascript/stylesheets/application.scss with this lonely line:
@import "~bootstrap/scss/bootstrap";
Finally, we need to add a line to app/views/layouts/application.html.erb for a stylesheet_pack_tag:
<!DOCTYPE html>
<html>
<head>
<title>Bootstrapper</title>
<%= csrf_meta_tags %>
<%= csp_meta_tag %>

<%= stylesheet_link_tag 'application', media: 'all', 'data-turbolinks-track': 'reload' %>
<%= stylesheet_pack_tag 'application', media: 'all', 'data-turbolinks-track': 'reload' %>
<%= javascript_pack_tag 'application', 'data-turbolinks-track': 'reload' %>
</head>

<body>
<%= yield %>
</body>
</html>
Whew. Now, we can restart the Rails server, reload the Monster Material page…and see that all that really happened was the fonts changed a little.


Still boring. That's okay. It's time to start experimenting with Bootstrap classes so we can prettify this table. Bootstrap has some incredibly clear documentation for us to select the look that we want. All we have to do is add classes to various elements in app/views/material/index.html.erb. The .table class is a must, and I also like the dark header row, the striped table, and the smaller rows, so let's add those classes to the table and thead elements:
<h1>Monster Materials</h1>

<table id="material-table" class="table table-striped table-sm">
<thead class="thead-dark">
<tr>
<th scope="col">Name</th>
<th scope="col">Grade</th>
<th scope="col">Type</th>
</tr>
</thead>
I added an id to the table as well so that we can specify additional properties in app/assets/stylesheets/material.scss because as it is, Bootstrap stretches this table all the way across the page. We can fix that by specifying a width in the .scss file using the new id, and since we're in there, why don't we add a bit of margin for the header and table, too:
h1 {
margin-left: 5px;
}

#material-table {
width: 350px;
margin-left: 5px;
}
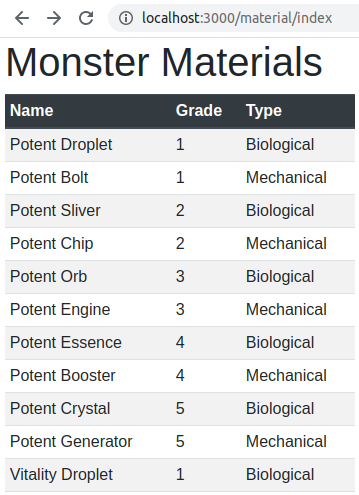
We end up with a nice, clean table to look at:


Isn't that slick? In fairly short order, we were able to set up an index page and our first table page view of monster materials, and we made the table look fairly decent. We have five more tables to go, and some of them are a bit more complicated than this one, to say the least. Our site navigation is also somewhere between clunky and non-existent. We'll make progress on both tables and navigation next time.

Monday, August 31, 2020

Neuralink: Elon Musk Presentó El Plan Para Implantar Chips En El Cerebro

More information


  1. Hacking Tools Software
  2. Hacker Security Tools
  3. Hack Tools Github
  4. Hacker Tools For Pc
  5. Hack Tools Mac
  6. Underground Hacker Sites
  7. Hacking Tools Kit
  8. Pentest Recon Tools
  9. Hacking Tools
  10. Hacking Tools Windows
  11. Hacker Tools Free Download
  12. Hacker Search Tools
  13. Pentest Tools Android
  14. Game Hacking
  15. Computer Hacker
  16. Hacking Tools Hardware
  17. Pentest Tools Linux
  18. Easy Hack Tools
  19. Hacking Tools Usb
  20. Pentest Tools Review
  21. Hacking Tools For Pc
  22. Hacking Tools Hardware
  23. Hacking Tools For Windows Free Download
  24. Beginner Hacker Tools
  25. Game Hacking
  26. Pentest Automation Tools
  27. Hacks And Tools
  28. Pentest Tools Linux
  29. New Hack Tools
  30. World No 1 Hacker Software
  31. Pentest Tools Url Fuzzer
  32. New Hacker Tools
  33. Usb Pentest Tools
  34. Hack Tools Online
  35. Nsa Hack Tools
  36. Pentest Tools Port Scanner
  37. Pentest Tools For Windows
  38. Hacking Tools Kit
  39. Pentest Tools Tcp Port Scanner
  40. Blackhat Hacker Tools
  41. Computer Hacker
  42. Pentest Tools List
  43. Free Pentest Tools For Windows
  44. Best Hacking Tools 2020
  45. Hacking Tools For Pc
  46. Pentest Tools Free
  47. New Hack Tools
  48. Hacker Tools For Pc
  49. Tools For Hacker
  50. Hacking Tools Mac
  51. Hacker Tools For Pc
  52. Termux Hacking Tools 2019
  53. Pentest Recon Tools
  54. Install Pentest Tools Ubuntu
  55. Growth Hacker Tools
  56. Hack Tools
  57. Pentest Tools Find Subdomains
  58. Hacker Tools For Pc
  59. Pentest Tools Website Vulnerability
  60. Hack Website Online Tool
  61. Hacker Tools Software
  62. Hack Tools Download
  63. Hacking Tools Pc
  64. Hacks And Tools
  65. Hack Tools
  66. Hacker Tools Hardware
  67. How To Install Pentest Tools In Ubuntu
  68. Best Pentesting Tools 2018
  69. Pentest Tools Github
  70. Pentest Reporting Tools
  71. Pentest Tools Nmap
  72. Pentest Tools Nmap
  73. Pentest Tools Tcp Port Scanner
  74. World No 1 Hacker Software
  75. Pentest Tools Website Vulnerability
  76. Hack Website Online Tool
  77. Pentest Tools Apk
  78. Best Hacking Tools 2020
  79. Top Pentest Tools
  80. Hacking Tools Name
  81. Pentest Tools
  82. Hack Tools For Windows
  83. Hack And Tools
  84. Hacking App
  85. Pentest Tools Website Vulnerability
  86. Bluetooth Hacking Tools Kali
  87. Hack App
  88. Pentest Recon Tools
  89. Hacker Tools 2019
  90. Easy Hack Tools
  91. Hacker Search Tools
  92. Hacking Tools Windows
  93. Hack Tools Online
  94. Android Hack Tools Github
  95. Black Hat Hacker Tools
  96. Hack Tools Github
  97. Pentest Tools Free
  98. Hacker Tools Github
  99. Hacker Tools Windows
  100. New Hack Tools
  101. Black Hat Hacker Tools
  102. Pentest Tools Tcp Port Scanner
  103. Underground Hacker Sites
  104. Tools Used For Hacking
  105. Hack And Tools
  106. Hack Tools For Windows
  107. Pentest Tools Website
  108. Hacker Tools Free
  109. Pentest Tools Kali Linux
  110. Hackrf Tools
  111. Hacker Tools Online
  112. Hack Tools Online
  113. Free Pentest Tools For Windows
  114. Pentest Tools Tcp Port Scanner
  115. Hacker Search Tools
  116. Pentest Tools Free
  117. Hacking Tools Free Download
  118. Black Hat Hacker Tools
  119. Game Hacking
  120. Pentest Tools Website
  121. Pentest Tools For Windows
  122. Hack Tools 2019
  123. Hack Tools For Windows
  124. Hack Tools
  125. Hacking Tools And Software
  126. Pentest Tools Windows
  127. Hacker Tools Free
  128. Underground Hacker Sites
  129. Game Hacking
  130. Pentest Tools Linux
  131. Hack And Tools
  132. Hacker Tools
  133. Hack Tools Download
  134. Hacking Apps
  135. Hacking Tools Download
  136. Hack Tools For Pc
  137. Pentest Reporting Tools
  138. Pentest Tools Linux
  139. Hack Tools
  140. Pentest Tools Free
  141. Pentest Reporting Tools
  142. Pentest Tools For Mac
  143. Hacker Tools Software
  144. Hacker Techniques Tools And Incident Handling
  145. Hacking Tools Pc
  146. Hacker Tools Mac
  147. Usb Pentest Tools
  148. Hacker Tools For Pc
  149. Hak5 Tools
  150. Kik Hack Tools
  151. Hacking Tools 2020
  152. Hacking Tools Hardware
  153. Pentest Tools Free
  154. Hackers Toolbox
  155. Hacker
  156. Android Hack Tools Github
  157. Pentest Tools Download
  158. Hack Tools For Windows
  159. World No 1 Hacker Software
  160. How To Hack
  161. Hacker Tools Hardware
  162. Hacker Tools
  163. Hacker Tools Free Download
  164. Hack And Tools
  165. Game Hacking
  166. Pentest Tools Website
  167. Hack Tools For Games
  168. Pentest Tools Apk
  169. Hacking Tools Download
  170. Growth Hacker Tools
  171. Hacking Tools Kit
  172. Pentest Tools Review
  173. Hacking Tools Windows 10
  174. Hacking Tools 2019
  175. Hack Rom Tools
  176. Hacking Apps
  177. Pentest Tools Port Scanner

Sunday, August 30, 2020

Exploiting Golang Unsafe Pointers


There are situations when c interacts with golang for example in a library, and its possible to exploit a golang function writing raw memory using an unsafe.Pointer() parameter.

When golang receive a null terminated string on a *C.Char parameter, can be converted to golang s tring with  s2 := C.GoString(s1) we can do string operations with s2 safelly if the null byte is there.

When golang receives a pointer to a buffer on an unsafe.Pointer() and the length of the buffer on a C.int, if the length is not cheated can be converted to a []byte safelly with b := C.GoBytes(buf,sz)

Buuut what happens if golang receives a pointer to a buffer on an unsafe.Pointer() and is an OUT variable? the golang routine has to write on this pointer unsafelly for example we can create a golangs memcpy in the following way:


We convert to uintptr for indexing the pointer and then convert again to pointer casted to a byte pointer dereferenced and every byte is writed in this way.

If b is controlled, the memory can be written and the return pointer of main.main or whatever function can be modified.

https://play.golang.org/p/HppcVpLfuMf


The return addres can be pinpointed, for example 0x41 buffer 0x42 address:


We can reproduce it simulating the buffer from golang in this way:


we can dump the address of a function and redirect the execution to it:


https://play.golang.org/p/7htJHJp8gUJ

In this way it's possible to build a rop chain using golang runtime to unprotect a shellcode.

More info

Support For XXE Attacks In SAML In Our Burp Suite Extension


In this post we present the new version of the Burp Suite extension EsPReSSO - Extension for Processing and Recognition of Single Sign-On Protocols. A DTD attacker was implemented on SAML services that was based on the DTD Cheat Sheet by the Chair for Network and Data Security (https://web-in-security.blogspot.de/2016/03/xxe-cheat-sheet.html). In addition, many fixes were added and a new SAML editor was merged. You can find the newest version release here: https://github.com/RUB-NDS/BurpSSOExtension/releases/tag/v3.1

New SAML editor

Before the new release, EsPReSSO had a simple SAML editor where the decoded SAML messages could be modified by the user. We extended the SAML editor so that the user has the possibility to define the encoding of the SAML message and to select their HTTP binding (HTTP-GET or HTTP-POST).

Redesigned SAML Encoder/Decoder

Enhancement of the SAML attacker

XML Signature Wrapping and XML Signature Faking attacks have already been part of the previous EsPReSSO version. Now the user can also perform DTD attacks! The user can select from 18 different attack vectors and manually refine them all before applying the change to the original message. Additional attack vectors can also be added by extending the XML config file of the DTD attacker.
The DTD attacker can also be started in a fully automated mode. This functionality is integrated in the BurpSuite Intruder.

DTD Attacker for SAML messages

Supporting further attacks

We implemented a CertificateViewer which extracts and decodes the certificates contained within the SAML tokens. In addition, a user interface for executing SignatureExclusion attack on SAML has been implemented.

Additional functions will follow in later versions.

Currently we are working on XML Encryption attacks.

This is a combined work from Nurullah Erinola, Nils Engelbertz, David Herring, Juraj Somorovsky, and Vladislav Mladenov.

The research was supported by the European Commission through the FutureTrust project (grant 700542-Future-Trust-H2020-DS-2015-1).
More articles

  1. Hacking Tools Software
  2. What Is Hacking Tools
  3. Physical Pentest Tools
  4. Wifi Hacker Tools For Windows
  5. Hacker Tool Kit
  6. How To Hack
  7. Pentest Tools Github
  8. Beginner Hacker Tools
  9. Hacker Tools Hardware
  10. Pentest Tools Website
  11. Hacker Tools Free Download
  12. Hack Tools Mac
  13. Pentest Tools
  14. Pentest Tools For Mac
  15. Hacker Tool Kit
  16. Hacker Tools Apk Download
  17. Hack Tools Mac
  18. Hacker Tools Windows
  19. Nsa Hack Tools
  20. How To Install Pentest Tools In Ubuntu
  21. Hacker Techniques Tools And Incident Handling
  22. Pentest Tools Free
  23. Pentest Tools Website Vulnerability
  24. Hacker Tools 2020
  25. Hack Tools Github
  26. Hacking Tools Usb
  27. Black Hat Hacker Tools
  28. How To Make Hacking Tools
  29. Hack Tools For Windows
  30. Pentest Tools Free
  31. Hacking Tools Software
  32. Github Hacking Tools
  33. Blackhat Hacker Tools
  34. Hacking Tools For Windows
  35. Hack Tools For Windows
  36. Hacker Tools For Mac
  37. Hacker Tools Apk Download
  38. Pentest Tools Review
  39. Hacking Tools
  40. Hacking Tools For Windows 7
  41. Hack Tools Mac
  42. Hack Tools Pc
  43. Pentest Tools For Ubuntu
  44. Hacking Tools
  45. Hacker Tools List
  46. Pentest Tools Url Fuzzer
  47. Physical Pentest Tools
  48. Pentest Tools Subdomain
  49. Hack Tools Online
  50. Hacking Tools Software
  51. Pentest Automation Tools
  52. Hacker Security Tools
  53. Hacking Tools For Windows Free Download
  54. Github Hacking Tools
  55. Growth Hacker Tools
  56. Hacking Tools Free Download
  57. Hacker Security Tools
  58. Pentest Tools Subdomain
  59. Hacking Tools Github
  60. Pentest Tools Website Vulnerability
  61. Hacking Tools 2020
  62. Hack Tools For Ubuntu
  63. Hacking Tools For Mac
  64. Hacker Tools Linux
  65. Github Hacking Tools
  66. Tools Used For Hacking
  67. Hacker Tools For Ios
  68. Hack Tools For Pc
  69. Pentest Tools Subdomain
  70. Hacker Tools Hardware
  71. Hack Tools For Mac
  72. World No 1 Hacker Software
  73. Hacking Tools For Mac
  74. What Are Hacking Tools
  75. Pentest Tools Website Vulnerability
  76. Termux Hacking Tools 2019
  77. Hacking Tools Windows 10
  78. Hacking Tools For Beginners
  79. World No 1 Hacker Software
  80. Hacking Tools Online
  81. Hacker Tools Free Download
  82. Hacking Tools Mac
  83. Blackhat Hacker Tools
  84. Hack And Tools
  85. Hacker Tools 2019
  86. Hacker Tools Apk Download
  87. Hack Tools Online
  88. Hack Tools Download
  89. Pentest Tools Framework
  90. Hacking Tools Download
  91. Hacker Search Tools
  92. Ethical Hacker Tools
  93. Hack Tool Apk No Root
  94. Hacking Tools Mac

Dotnet-Interviews