A New Internet Library: Add Your Website/Blog or Suggest A Website/Blog to our Free Web Directory http://anil.myfunda.net.

Its very simple, free and SEO Friendly.
Submit Now....

Friday, September 4, 2020

Exploring Monster Taming Mechanics In Final Fantasy XIII-2: Viewing Data

Rails apps are built on an MVC (Model, View, Controller) architecture. In the last few articles of this miniseries, we've focused exclusively on the model component of MVC, building tables in the database, building corresponding models in Rails, and importing the data through Rails models into the database. Now that we have a bunch of monster taming data in the database, we want to be able to look at that data and browse through it in a simple way. We want a view of that data. In order to get that view, we'll need to request data from the model and make it available to the view for display, and that is done through the controller. The view and controller are tightly coupled, so that we can't have a view without the controller to handle the data. We also need to be able to navigate to the view in a browser, which means we'll need to briefly cover routes as well. Since that's quite a bit of stuff to cover, we'll start with the simpler monster material model as a vehicle for explanation.

Final Fantasy XIII-2 Battle Scene

Create All The Things

Before we create the view for the monster material model, we'll want to create an index page that will have links to all of the views and different analyses we'll be creating. This index will be a simple, static page so it's an even better place to start than the material view. To create the controller and view for an index page, we enter this in the shell:
$ rails g controller Home index
This command creates a bunch of files, but most importantly for this discussion it creates app/controllers/home_controller.rb and app/views/home/index.erb. If you haven't guessed by the names, these are our home controller and view for the index page, respectively. The command also creates an entry in config/routes.rb for the route to the index page. We want to add an entry to this file so that going to the root of our website will also take us to the index:
Rails.application.routes.draw do
get 'home/index'
root 'home#index'
end
These routes are simple. The first one says if we go to our website (which will be at http://localhost:3000/ when we start up the server in a minute), and go to http://localhost:3000/home/index, the HTML in app/views/home/index.erb will be rendered to the browser. The next line says if we go to http://localhost:3000/, that same HTML will be rendered. Currently, that page will show a simple header with the name of the controller and action associated with the page, and the file path to the view:
<h1>Home#index</h1>
<p>Find me in app/views/home/index.html.erb</p>
Let's change that to something closer to what we're aiming for:
<h1>Final Fantasy XIII-2 Monster Taming</h1>
<%= link_to 'Monster Materials', '#' %>
That second line with the link is created with a special line of code using the '<%= ... %>' designation. This file is not pure HTML, but HAML, an HTML templating language. The '<%= … %>' tag  actually means that whatever's inside it should be executed as code and the output is put in its place as HTML. The link_to function is a Rails function that creates the HTML for a link with the given parameters. Now we have a proper title and the first link to a table of data that doesn't exist. That's why I used the '#' character for the link. It tells Rails that there should be a link here, but we don't know what it is, yet. More precisely, Rails will ignore the '#' at the end of a URL, so the link will show up, but it won't do anything when it's clicked. Now let's build the page that will fill in the endpoint for that link.

Create a Monster Materials Page

Notice that for the index page we created a controller, but we didn't do anything with it. The boilerplate code created by Rails was sufficient to display the page that we created. For the materials page we'll need to do a little more work because we're going to be displaying data from the material table in the database, and the controller will need to make that data available to the view for display. First thing's first, we need to create the controller in the shell:
$ rails g controller Material index
This command is identical to the last Rails command, and it creates all of the same files for a material controller and view and adds an entry in config/routes.rb for the new page:
Rails.application.routes.draw do
get 'material/index'
get 'home/index'
root 'home#index'
end
In both cases we're creating a controller with only one action, but a Rails controller can have many different actions for creating, reading, updating, and deleting objects from a model. These are referred to as CRUD actions. Since we're only going to be viewing this data, not changing it in any way, we just need the read actions, and more specifically the index action because we're only going to look at the table, not individual records. Therefore, we specified the 'index' action in the generate command so the others wouldn't be created. Now it's time to do something useful with that action in app/controllers/material_controller.rb:
class MaterialController < ApplicationController
def index
@materials = Material.all
end
end
All we had to do was add that one line in the index action, and we've made all of the material model data available to the view. The view has access to any instance variables that are assigned in the controller, so @materials contains all the data we need to build a view of the material table. The HTML code to render the view is a bit more complex, but still pretty simple:
<h1>Monster Materials</h1>

<table>
<tr>
<th>Name</th>
<th>Grade</th>
<th>Type</th>
</tr>

<% @materials.each do |material| %>
<tr>
<td><%= material.name %></td>
<td><%= material.grade %></td>
<td><%= material.material_type %></td>
</tr>
<% end %>
</table>
The first half of this code is normal HTML with the start of a table and a header defined. The rows of table data are done with a little HAML to iterate through every material that we have available in the @materials variable. The line with '<% ... %>' just executes what's within the brackets without outputting anything to render. The lines that specify the table data for each cell with '<%= ... %>' will send whatever output happens—in this case the values of the material properties—to the renderer. We could even create dynamic HTML tags in this embedded code to send to the renderer, if we needed to. Here we were able to create the 40 rows of this table in seven lines of code by looping through each material and sending out the property values to the table. This tool is simple, but powerful.

Now we have another page with a table of monster materials, but we can only reach it by typing the correct path into the address bar. We need to update the link on our index page:
<h1>Final Fantasy XIII-2 Monster Taming</h1>
<%= link_to 'Monster Materials', material_index_path %>
It's as simple as using the provided helper function for that route! Rails creates variables for every route defined in config/routes.rb along with a bunch of default routes for other things that we won't get into. We can see these routes by running "rails routes" in the shell, or navigating to /routes on the website. Actually, trying to navigate to any route that doesn't exist will show the routes and their helper functions, which is what happens when we try to get to /routes, too. How convenient. Now we can get to the monster material table from the main index, and amazingly, the table is sorted the same way it was when we imported it. It's pretty plain, though.

Adding Some Polish

The material table view is functional, but it would be nicer to look at if it wasn't so...boring. We can add some polish with the popular front-end library, Bootstrap. There are numerous other more fully featured, more complicated front-end libraries out there, but Bootstrap is clean and easy so that's what we're using. We're going to need to install a few gems and make some other changes to config files to get everything set up. To make matters more complicated, the instructions on the GitHub Bootstrap Ruby Gem page are for Rails 5 using Bundler, but Rails 6 uses Webpacker, which works a bit differently. I'll quickly summarize the steps to run through to get Bootstrap installed in Rails 6 from this nice tutorial.

First, use yarn to install Bootstrap, jQuery, and Popper.js:
$ yarn add bootstrap jquery popper.js
Next, add Bootstrap to the Rails environment by adding the middle section of the following snippet to config/webpack/environment.js between the existing top and bottom lines:
const { environment } = require('@rails/webpacker')

const webpack = require('webpack')
environment.plugins.append('Provide',
new webpack.ProvidePlugin({
$: 'jquery',
jQuery: 'jquery',
Popper: ['popper.js', 'default']
})
)

module.exports = environment
Then, set up Bootstrap to start with Rails in app/javascript/packs/application.js by adding this snippet after the require statements:
import "bootstrap";
import "../stylesheets/application";

document.addEventListener("turbolinks:load", () => {
$('[data-toggle="tooltip"]').tooltip()
$('[data-toggle="popover"]').popover()
})
We may never need the tooltip and popover event listeners, but we'll add them just in case. As for that second import statement, we need to create that file under app/javascript/stylesheets/application.scss with this lonely line:
@import "~bootstrap/scss/bootstrap";
Finally, we need to add a line to app/views/layouts/application.html.erb for a stylesheet_pack_tag:
<!DOCTYPE html>
<html>
<head>
<title>Bootstrapper</title>
<%= csrf_meta_tags %>
<%= csp_meta_tag %>

<%= stylesheet_link_tag 'application', media: 'all', 'data-turbolinks-track': 'reload' %>
<%= stylesheet_pack_tag 'application', media: 'all', 'data-turbolinks-track': 'reload' %>
<%= javascript_pack_tag 'application', 'data-turbolinks-track': 'reload' %>
</head>

<body>
<%= yield %>
</body>
</html>
Whew. Now, we can restart the Rails server, reload the Monster Material page…and see that all that really happened was the fonts changed a little.


Still boring. That's okay. It's time to start experimenting with Bootstrap classes so we can prettify this table. Bootstrap has some incredibly clear documentation for us to select the look that we want. All we have to do is add classes to various elements in app/views/material/index.html.erb. The .table class is a must, and I also like the dark header row, the striped table, and the smaller rows, so let's add those classes to the table and thead elements:
<h1>Monster Materials</h1>

<table id="material-table" class="table table-striped table-sm">
<thead class="thead-dark">
<tr>
<th scope="col">Name</th>
<th scope="col">Grade</th>
<th scope="col">Type</th>
</tr>
</thead>
I added an id to the table as well so that we can specify additional properties in app/assets/stylesheets/material.scss because as it is, Bootstrap stretches this table all the way across the page. We can fix that by specifying a width in the .scss file using the new id, and since we're in there, why don't we add a bit of margin for the header and table, too:
h1 {
margin-left: 5px;
}

#material-table {
width: 350px;
margin-left: 5px;
}
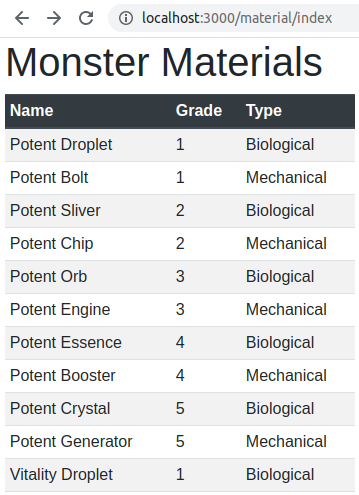
We end up with a nice, clean table to look at:


Isn't that slick? In fairly short order, we were able to set up an index page and our first table page view of monster materials, and we made the table look fairly decent. We have five more tables to go, and some of them are a bit more complicated than this one, to say the least. Our site navigation is also somewhere between clunky and non-existent. We'll make progress on both tables and navigation next time.

No comments:

Post a Comment

Post your comments here:

Dotnet-Interviews